Manufacturer : Panel Bender Press Brakes Sales Contact : JACK HE Tel : +86-136-8741-4431 Email to : info@ragoscnc.com
PROVIDE CUSTOM EDITING

Manufacturer : Panel Bender Press Brakes Sales Contact : JACK HE Tel : +86-136-8741-4431 Email to : info@ragoscnc.com
PROVIDE CUSTOM EDITING

Common errors by a new press brake operator fall into four categories: paperwork, the machine, operational mistakes, and hand measurement tools
Question: I have just started my journey as a press brake operator. I am someone who values a good work ethic, and my supervisors were able to see that in me, so I have been given the opportunity to take on a new challenge. I am optimistic as they have provided training. At this point I’m doing research to better my understanding of the position.
My question is this: What is the most common mistake I will likely run into, and what is the best way to further my understanding of reading prints using dial calipers and protractors? I am 25, and unfortunately, I have never been great at basic math, so I am trying my best to learn as quickly as possible.
Answer: That, sir, is an excellent follow-up question to an earlier column of mine, “What you need to know if you’re new to the press brake.” It is also a question that isn’t as easy to answer as you might think.
A new press brake operator’s common errors fall into four categories: paperwork, the machine, operational mistakes, and hand measurement tools. I’ll give a few examples in each category along with a few suggestions for improving your game.
As a newbie, you might misread print details or miss some critical information. Misreading the print can lead to a variety of operational errors, and bending a part backward (more on this later) is by far the most common.
Other details you might miss involve tolerancing. What is the allowable error, or are you interpreting the tolerances correctly? If you are working from a CAD file, where everything is called to three decimal places and a tolerance block or information is not available, you will need to know what your house practices are to deal with the error.
Trust me, there will always be variations. These generally are due to material variations. For one thing, every material gauge has a thickness tolerance. For instance, 16-ga. material could be as thin as 0.053 in. or as thick as 0.067 in. In theory, the material thickness could vary up to 0.015 in. from piece to piece. Compound that by multiple bends, and, well, you get the picture. Check out “Reasonable tolerancing for press brake bending” by typing the title into the search bar at thefabricator.com.
As a newbie, you might forget to review the setup sheet for any special instructions. If your company uses statistical process control (SPC), you might fail to chart the required data properly.
Some jobs require special handling. For instance, some parts require you to start bending a part, stop halfway through so another process can be completed (setting hardware, for example), then return to the brake to perform the final forming operations. These details can sometimes be on the print, but they’re usually on the work order or instructions. Be sure to check these thoroughly.
As a newbie, you might experience various challenges on the press brake itself. For example, you might forget to ensure that the punch and dies are centered. You may not yet be allowed to perform this task because you are new. But you’ll need to check the tools regardless and get help to correct any misalignment. Ensuring proper alignment will save you many frustrating hours of production.
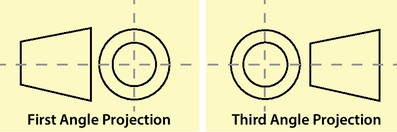
FIGURE 1. The first-angle projection and third-angle projection symbols depict a cone. How the cone is manipulated from one view to the next depends on the projection method. In North America, the third-angle projection is most common.
Second, make sure your backgauge stops are parallel and that the flanges measure the same, without taper. On that same note, be sure that your angles are correct and without taper.
Also look out for general maintenance issues. If your machine uses compressed air, you need to drain the water trap. You must also keep your press brake well lubricated and wiped down. Do this at the start and end of your shift, but also during the day if necessary.
Finally, if you’re operating a hydraulic press brake at the beginning of the day, cycle the machine for several minutes to get it warmed up and the hydraulics flowing. Make this part of your startup procedure. A press brake with cold hydraulics will run differently than the same machine with warm hydraulics. If you start making parts with a cold machine, you will find yourself making many angle adjustments to the program before the program and parts stabilize.
If you’re a newbie, you’ve likely bent a flange in the wrong direction. It’s the most common operator mistake by far, even for experienced operators. There are several reasons for this. First, operators fail to pay attention to the angle projection of the print. Does the print show a first- or third-angle projection? Does the part bend up or down? This is why, on every print, you need to look for the angle projection block, found in the title block in the lower right-hand corner.
Since most blueprints in the U.S. follow the third-angle projection, let’s take a look at the first- and third-angle projection symbol (see Figure 1). These show two views of a truncated cone laid out in their respective projection method.
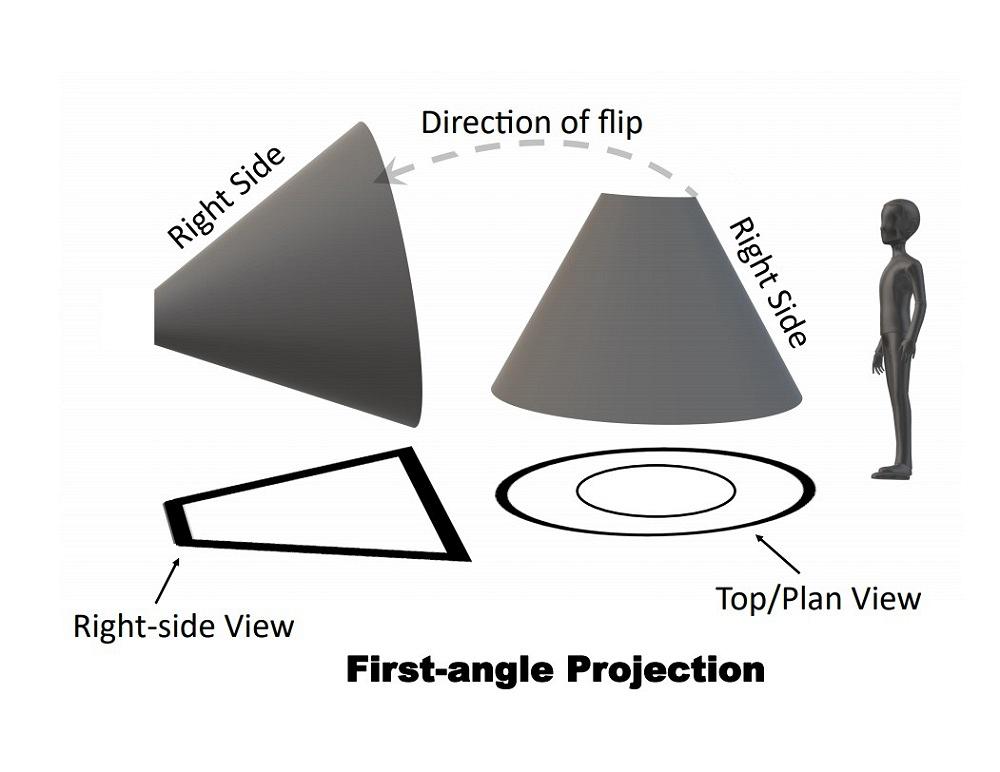
To understand what these symbols signify, you need to look at the cone as a solid object. Which way do you flip the cone to get the image in the crosshairs? In North America, we generally use third-angle projection, so we would flip the cone under (see Figure 2).
An easy way to envision this concept is to look at your part as a bowl of water that will pour on you when flipped, as shown in Figure 2. Meanwhile, in the first-angle projection, you flip the bowl of water in the opposite direction, pouring water away from you and onto your co-worker, as depicted in Figure 3.
Once you learn the basics of how to read a print—including how the part is reoriented from one view to the next on the drawing—the easiest way to stop bending your parts backward is this: Stack them accordingly so that each blank is already oriented the way you need to perform the first bend—no rotating or flipping required. That way, when you pick up the first part and turn toward the toolset on the press brake, the bend will be in the right direction.
Forming order is another issue; where do you start? That is a very part-specific question, but once you decide, make sure that you always start with the right flange and that it matches the one on the print, per the angle-projection solution. Again, stack the parts so when you pick up the flat part and turn to the press brake, the first flange that needs to be formed is the flange that’s against the stops.
Also, try to make any additional moves as naturally as possible. For instance, if it is natural for you to move to the right, the toolset for the next bend should be to the right of the first one. Working with your natural movements can prevent a lot of unnecessary irritation throughout a run of parts. Bear in mind, however, that if you are picking up a job in progress from another operator, you cannot justify changing a running setup, and you will have to live with the setup as is.
Finally, as a newbie, you need to know how to use hand measurement tools properly. Start by ensuring your tools are clean, adjusted, and calibrated to a standard, even if you are using company tools that have been inspected and certified by quality control. You still need to recheck them before use to ensure they are still in good working order. Things happen, tools get dropped, and they can get knocked out of adjustment.
Once you are comfortable that your tools are ready to go, how do you use them correctly? Let’s discuss the calipers first. Calipers must have a small amount of clearance between the head and body to allow for movement. This clearance invokes a small amount of measurement error between the top and bottom of the measurement jaws.

FIGURE 2. The part flips “under” (as shown) in the third-angle projection. Imagine the truncated cone as a bowl full of water. Flipped this way, the water in the bowl would flow toward the person in the image. This projection is most common in North America.
If you hold your part against the head or moving jaw, you can force the error within the caliper into the reading, possibly giving you an incorrect measurement. It is best practice to hold your part against the caliper body, which is fixed. Simply slide the head up to the part to take the measurement, thus taking any error in the tool out of the reading.
Finally, you need to know how to check your angles. Always measure your angle in several places, not just one point. Also, make sure whether the angle being checked is being measured from the inside or outside of the bend (see Figure 4). If you are using one of the less expensive protractors, make sure you are reading the right side of the scale.
You will encounter many other common mistakes over time. But for now, these will keep you busy. Remember never to rush, learn to read prints, and always check the way that you are handling the parts themselves.
Remember that press brake operations will always be a practiced art. It takes many years to perfect the craft. As I have noted in my column before, if you enjoy running a press brake, stay the course; it can become a profitable and rewarding career.
Copyright © 2025 Foshan Ragos NC Equipment co.,LTD. (panel bender) | All Rights Reserved
We are here to help you! If you close the chatbox, you will automatically receive a response from us via e-mail. Please be sure to leave your contact details so that we can better assist you.